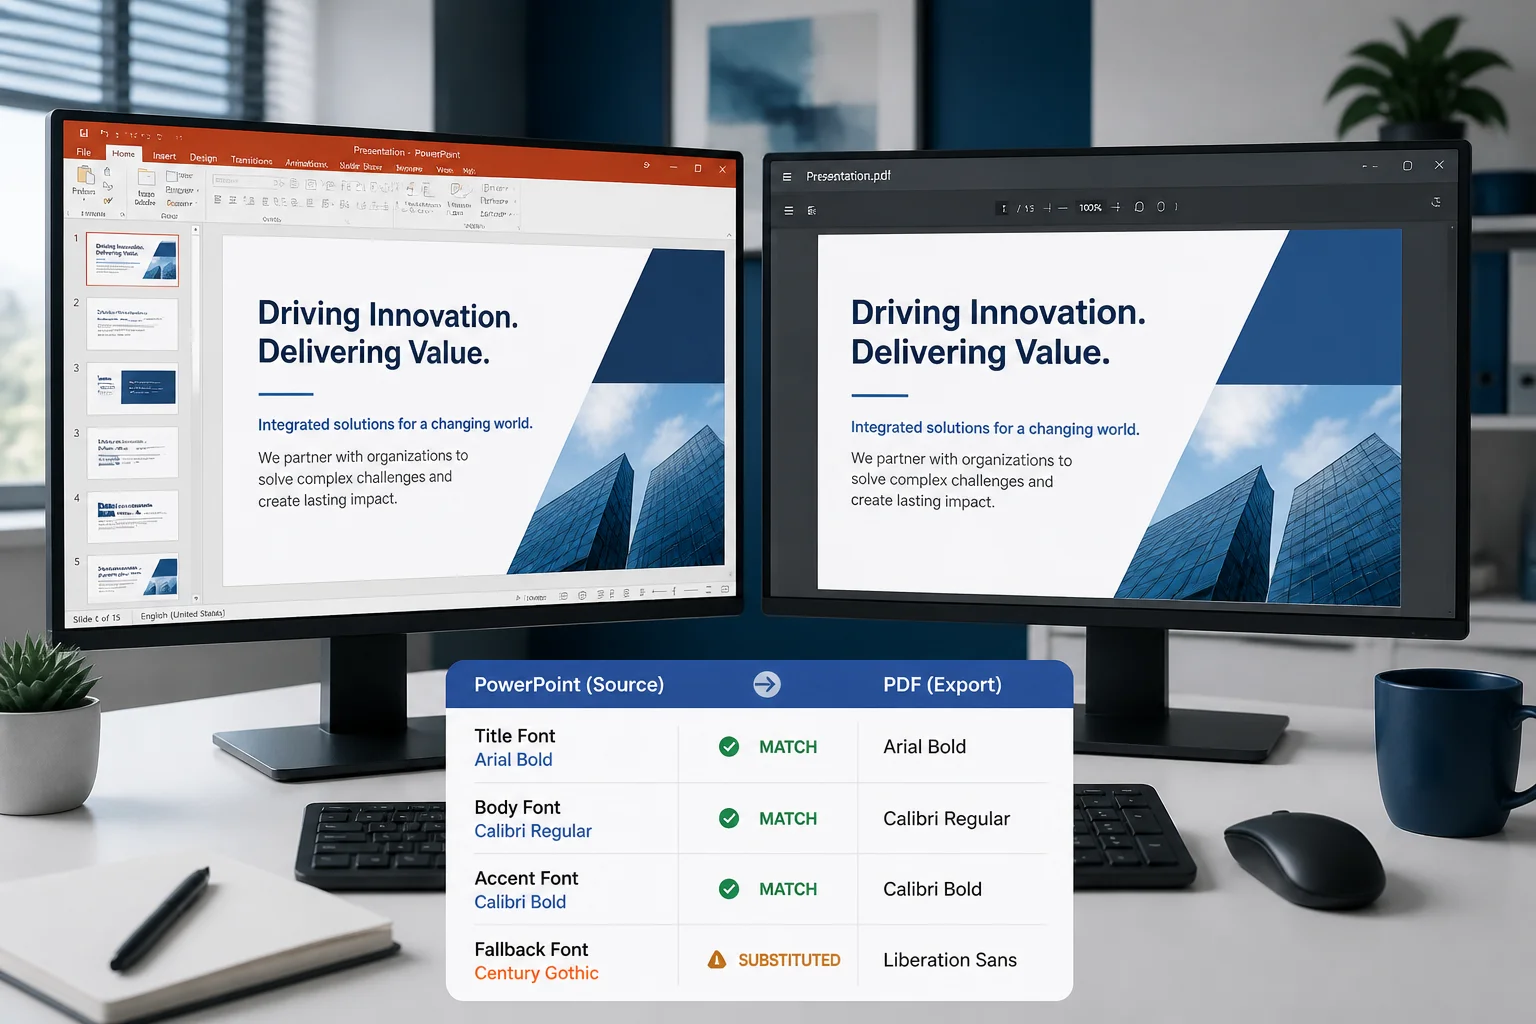
If your PowerPoint fonts change in PDF, the problem is usually caused by font substitution, missing font files, unsupported font features, or text that no longer fits the same way after export. The quickest fix is to identify the font used in the original presentation, install or replace it, check the affected text boxes, and export the presentation again using PowerPoint’s PDF option.
Before sending or printing the PDF, open it on the same computer and, if possible, another device. A presentation can look correct in PowerPoint while the exported PDF contains a different typeface, altered line breaks, missing symbols, or shifted text.
Why PowerPoint fonts change when exported to PDF

PowerPoint does not always draw text in exactly the same way in a PDF as it does on a slide. During export, it has to translate the presentation’s text, fonts, spacing, and layout into a fixed-page document. Several issues can affect that process.
The font is not installed
If a presentation uses a font that is missing from the computer performing the export, PowerPoint may replace it with a similar font. This replacement can change character widths, line spacing, and the position of nearby objects.
The font is unavailable to the PDF exporter
A font may appear on one computer but not another. This often happens when a file was created by a colleague, downloaded from the internet, or moved between Windows and macOS. The presentation may retain the font name even though the actual font is not available for export.
The font is not embedded in the presentation
PowerPoint can embed some fonts in a presentation, but font embedding depends on the font’s licensing permissions. If embedding is unavailable, the file may rely on the recipient’s computer having the same font installed.
Text reflows during export
Even when the font name appears unchanged, small differences in font metrics can alter line wrapping. A title that fits on one line in PowerPoint may wrap onto two lines in the PDF. This can make text appear to have moved or changed size.
The font contains unsupported characters or features
Special symbols, accented letters, emoji, alternate characters, and complex scripts may not render as expected if the font or export process does not handle them correctly. This can result in empty boxes, missing glyphs, or a replacement typeface.
First, identify exactly what changed
Before changing the entire presentation, compare the original slide and the PDF carefully. Determine whether the issue is a changed font, a layout shift, or a missing character.
- Different typeface: The letters visibly use another font.
- Different weight: Bold or semibold text looks lighter or heavier.
- Changed spacing: Words or letters appear more spread out or compressed.
- New line breaks: A paragraph, title, or bullet wraps differently.
- Missing characters: Symbols or accented letters become boxes or disappear.
- Text clipping: The last words in a text box are cut off.
- Font changes on only some slides: Certain fonts, objects, or slide layouts are affected while others look normal.
This distinction matters. Installing the correct font may solve substitution, but it will not necessarily fix an overflowing text box or a symbol that the font does not contain.
Fix 1: Install the correct fonts before exporting
The most common solution is to install every font used by the presentation on the computer that creates the PDF.
- Open the presentation in PowerPoint.
- Check the fonts used in the affected title, paragraph, table, chart, or footer.
- Obtain the correct font from the font designer, your organization, or the presentation’s author.
- Install the font on the computer used for export.
- Close and reopen PowerPoint so it can reload the font.
- Review the slides and export the PDF again.
Do not download a random copy of a font simply because it has the same name. Different versions or unofficial files can produce different metrics, licensing restrictions, or rendering results. If you cannot obtain the original font, replace it deliberately with a widely available alternative and then adjust the layout.
Fix 2: Replace missing fonts throughout the presentation
If the original font is unavailable, replacing it consistently is usually better than allowing PowerPoint to substitute fonts unpredictably.
In PowerPoint, use the font replacement command where available to replace the missing typeface across the presentation. Then inspect master slides, notes, tables, charts, SmartArt, headers, and footers. Some text may be stored in objects or layouts that are easy to overlook.
Choose a replacement with similar proportions. For example, a narrow sans-serif font should generally be replaced with another relatively narrow sans-serif font, not a wide serif font. After replacement, check:
- Title and subtitle line breaks
- Bullet indentation
- Text inside tables and shapes
- Chart labels and legends
- Footer and page-number areas
- Text boxes close to slide edges
Fix 3: Embed fonts in the PowerPoint file when possible
Embedding fonts can help preserve the intended appearance when the presentation is opened or exported on another computer. In PowerPoint’s save options, look for the setting that embeds fonts in the file.
Font embedding is not guaranteed for every typeface. Some fonts prohibit embedding because of their licensing settings. If PowerPoint reports that a font cannot be embedded, use a font that permits embedding or install the font directly on the computer used for conversion.
Embedding also does not replace visual checking. A presentation can contain an embedded font and still show layout problems caused by text box size, unsupported characters, or unusual effects.
Fix 4: Check the presentation theme and slide master
A font may be changing because the presentation theme assigns a different heading or body font than the one you selected manually. Slide masters can also contain text placeholders with their own formatting.
Open the slide master and review the theme fonts. Confirm that the heading and body fonts are intentional, then check the layouts used by the affected slides. If a slide was copied from another presentation, it may carry a different theme or local formatting.
When possible, apply fonts through the theme or master rather than formatting every text box separately. This creates a more consistent file and makes future font replacement easier.
Fix 5: Prevent text from shifting or being cut off
If the typeface is correct but the PDF still looks wrong, the problem may be text reflow. A small change in character width can make a text box overflow.
Use these adjustments:
- Make the text box slightly wider or taller.
- Reduce the font size by a small amount.
- Shorten long headings and remove unnecessary line breaks.
- Check paragraph spacing before and after each paragraph.
- Review line spacing and character spacing.
- Turn off automatic shrink-to-fit settings if they produce inconsistent results.
- Leave extra space around text near images, borders, and slide edges.
Do not rely on a text box that fits only because the current screen preview happens to display it a certain way. Give important headings and paragraphs enough space to tolerate minor rendering differences.
Fix 6: Check symbols, icons, and special characters
Fonts used for icons, arrows, mathematical symbols, or unusual characters can be especially prone to export problems. If a symbol disappears or turns into a square, confirm that the selected font actually contains that character.
For essential visual symbols, consider replacing font-based icons with image or vector graphics. This can make the appearance more predictable in a PDF, although the graphic should still be checked for quality and positioning after export.
For ordinary text, use a font that supports the required language and characters. A font may display English correctly while lacking certain accented letters or non-Latin scripts.
Use PowerPoint’s built-in PDF export first
When possible, export from the desktop version of PowerPoint using its built-in PDF or “Create PDF” option. This keeps the conversion close to the original presentation environment and gives you access to PowerPoint’s font and layout settings.
Before exporting, check the page size, slide orientation, print settings, and whether you are exporting slides, notes, or handouts. A PDF designed for printing may have different spacing from a PDF intended only for screen sharing.
If you need another workflow, you can also use a PowerPoint-to-PDF method without PowerPoint. However, compare the result carefully when fonts are important, because different applications can interpret presentation formatting differently.
What to do when you cannot fix the original font
If the font is proprietary, unavailable, corrupted, or not permitted to be embedded, use a controlled fallback rather than repeatedly exporting the same file.
- Make a copy of the presentation.
- Replace the unavailable font with a permitted alternative.
- Review every slide for wrapping and alignment changes.
- Save the corrected presentation under a new name.
- Export a new PDF.
- Compare the PDF with the presentation and correct any remaining overflow.
For a final, non-editable document, converting essential text into graphics may preserve its appearance, but this can reduce searchability, accessibility, and editability. It should be reserved for specific elements that cannot be rendered reliably as live text.
How to check the PDF before sharing it
Do not judge the result only from PowerPoint’s export confirmation. Open the PDF in a PDF viewer and inspect it at normal and high zoom.
- Check every slide with a title or dense paragraph.
- Look for changed line breaks and clipped text.
- Search for a word that uses the affected font.
- Zoom in on small text, symbols, and accented characters.
- Print one or two representative pages if the PDF will be printed.
- Open the file on another device or in another PDF viewer.
- Confirm that hyperlinks, page numbers, and footers remain positioned correctly.
If the PDF is going to someone else, ask whether they need selectable and searchable text. Flattening or converting text into images may preserve the visual design but can make the document harder to search, copy, or use with assistive technology.
Quick troubleshooting checklist
| Problem | Likely cause | Best first step |
|---|---|---|
| The whole presentation uses a different font | Font is missing or unavailable | Install the original font or replace it consistently |
| Only one slide changes | Local formatting, copied content, or a different layout | Check the slide master, theme, and text boxes |
| Words wrap onto new lines | Different font metrics or insufficient text-box space | Widen the box, adjust spacing, or use a closer font match |
| Symbols become squares | Missing glyphs or unsupported characters | Use a font that contains the character or replace the symbol with a graphic |
| Text is cut off | Overflow after reflow | Increase the box size and inspect automatic text fitting |
| PDF looks different in print | Print settings, page size, or printer scaling | Check PDF page size and print at actual size |
Final takeaway
When PowerPoint fonts change in PDF, start with the font itself: confirm that it is installed, permitted for embedding, and available on the computer performing the export. Then check theme settings, slide masters, text-box dimensions, special characters, and export settings.
The most reliable workflow is to fix the presentation first, export again, and inspect the actual PDF rather than assuming the conversion worked. If you need a different conversion method, see the guide to converting PPTX to PDF online, then verify fonts and layout before sharing the final file.
Related: How to Make a PowerPoint PDF Searchable and Selectable
Related: How to Convert a PowerPoint Presentation With Non-Latin Text Without Broken Characters
2 thoughts on “How to Fix Fonts Changing When PowerPoint Is Converted to PDF”